I’m back with another addition to the beauty basics series! Highlighting and contouring can give you a slim and flawless multidimensional look when you apply your makeup. Watch our video and learn a few easy tips/tricks on how to contour/highlight/bronze your skin in a flawless way!
[Subscribe To Our YouTube Channel for more BG Related Stories!]
And for more daily beauty tips and ideas, follow Sapna on Instagram and Twitter!
————————————–
Products Used:
Bobbi Brown Skin Foundation #7
Beauty Blender
MAC Cosmetics ProLongwear Concealer NW25
YSL Touché Eclat #8
Ben Nye Banana Powder
Benefit Hoola Bronzer
Stila Brush #24
BECCA Shimmering Skin Perfector Opal
Hard Candy So Baked Bronzer #129 Tiki
Laura Mercier Fan Powder Brush
Urban Decay All Nighter Makeup Setting Spray
————————————-
For a more detailed step-by-step list on how to contour and highlight, follow our guide:
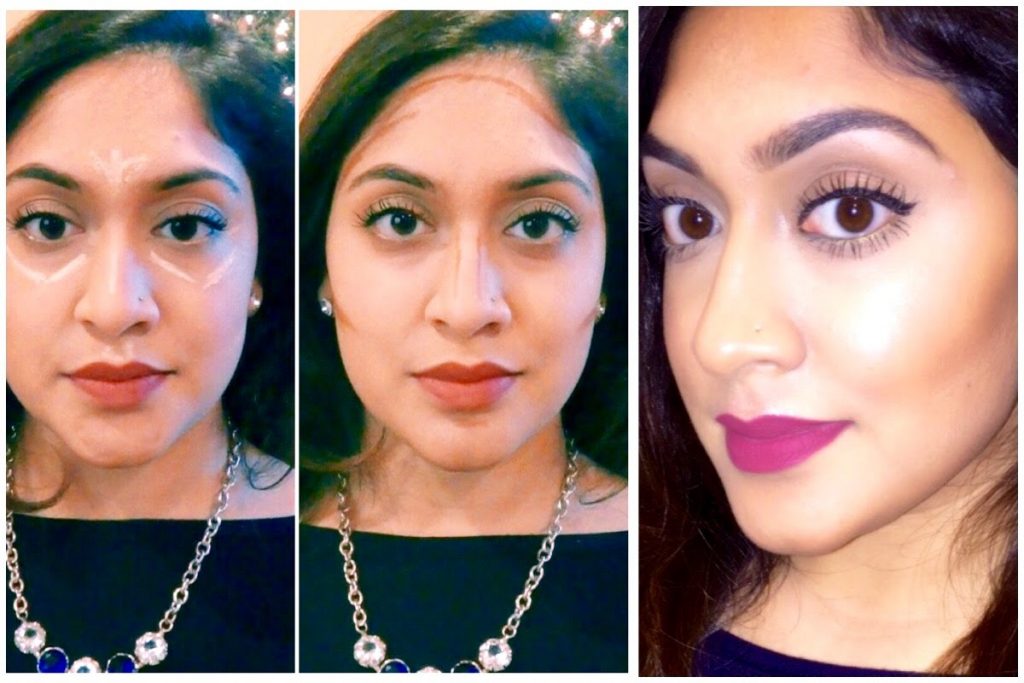
Contouring and highlighting is that new makeup trend everyone wants to achieve because it gives every woman a perfectly sculpted face. While I think its great for photos and special occasion makeup and for big events, day-to-day it can be way too much and unnecessary. The keys are blending it well to give a naturally sculpted face because harsh color placement that let’s be honest, is not cute. An easy quick way for day to day wear is to use bronzer to add warmth to the perimeters of your face and subtle definition.
This may be more appropriate during the day and in office or corporate settings. Remember, practice makes perfect. Play with shades and see what suits you skin tone best. Everyone’s skin color and face shape is different so what may work for others may have to be altered to suit your face shape. Watch the video I created below to learn some tips and tricks to achieving the perfectly sculpted face on your next night out.
1. Start with Prepped skin, always moisturize and/or prime! Layering products can tend to get cakey, greasy or settle into fine lines especially when worn hours at a time so this step is crucial.
2. Apply foundation. Apply liquid or cream products before using any powder products. A sheer layer of foundation gives creams something to glide onto and makes it easier to blend into the skin. If you don’t want to use a matching foundation first, and want to just use a highlight/contour shades then DON’T go extreme with your highlight/contour shades. Use a few shades darker/lighter than your actual foundation. You don’t want go extremely light/extremely dark because the light may be too light if your tone isn’t even underneath and it’ll tend to look gray. Similarly the dark areas won’t blend well which tends to look more harsh than shadow-like. So generally a few shades darker than your foundation and vice versa for highlight.
3. Contour is applied in areas you would like to define and recede. Around the forehead, temples in some cases, hollows of your cheeks, and sides of the nose. Highlight is applied to area you would like to bring forward and enhance such as centers of the face; tops of the cheeks, above your cupid’s bow, bridge of the nose, between your eyebrows, tear ducts, and the arch of your brows.
4. Apply contour shade with a stiffer synthetic brush and blend out with a makeup sponge-like the beauty blender to sheer out the product and absorb any excess. A stiff brush will ensure the product applies directly to the spots you desire vs. a flimsy brush will cover a larger surface area of the face leading to a muddy look. (You can stick with the same stiff brush if you don’t have a sponge, but make sure it is clean before dipping into any other products you may use.) For powders products, use a denser brush for the same reason.
5. Powder lightly after smoothing/blending out under eyes or wherever the product has settled. All that work will go to waste if it’s not set with powder so set everything with translucent powder. If your contour shade is too harsh apply a powder foundation that matches your skin tone to equalize and mute the dark contour. Apply a shimmery product on top of the highlight area for added glow that catches the light. Try to avoid shimmers if you have larger pores/acne or any other texture issues because shimmer will enhance this.